
Hello fine sew-alongers! Welcome to the Peggy skirt sew-along. I hope you're as excited as i am to kick off with the sew-along and sew up some gorgeous Peggy skirts?!
Today for the 1 st post for the sew-along we will cover the basics of getting started with the Peggy pattern, so you will be starting on the right track to sewing up a cute Peggy skirt or two. Although this may seem a bit on the tedious side of things, completing these steps will ensure you will be sewing up a well made and fitted Peggy skirt.
- Fabric choices
- Finding your size
- Tracing the pattern
- Cutting and marking your fabric
I would really love to see how you gals go throughout the sew-along! So please don’t hesitate to post your links to the Facebook page, tweet me and Instagram your progress @bluegingerdoll using the hashtag #thepeggyskirtsewalong. I have also created a Flickr group where you can upload your Peggy skirts ( progress or completed) i will then be rounding up all of your lovely Peggy skirts after the sew - along here on the blog!
I'm also around, so if you want to ask me a questions directly feel free to email me at: abby@bluegingerdoll.com and i'll try my best to help you out!!
I'm also around, so if you want to ask me a questions directly feel free to email me at: abby@bluegingerdoll.com and i'll try my best to help you out!!
The Peggy skirt is recommend as a beginner level sewing pattern but would easily suit any level of sewist. It is a great skirt design to be added to any handmade wardrobe.
FABRIC
The best place to start when choosing the right fabric for your pattern is to have a look at the back of the pattern envelope at the listed recommended fabrics.
I have recommended Chambray, cotton and cotton blends, Linen, wool and wool blends, but the great thing about the Peggy skirt is the ultimate foundation to experiment with a variety of fabric choices, so i say have fun with your fabric choices.
If you need some inspiration for your Peggy skirt have a look at the below at a few examples. The Peggy skirt is great to for bright and bolds prints, florals as well throughout all seasons so think wool plaids for winter or bright bold colors for the warmer months.

The Peggy skirt by Bex

Cotton polka dot Peggy skirt by me.

Chambray Peggy skirt
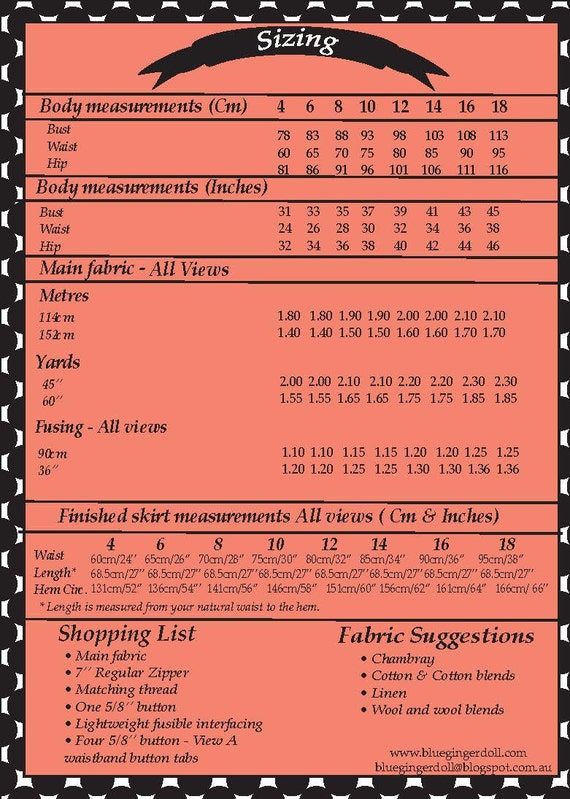
Finding your size & Fit

Use the above diagram to measure yourself correctly. The Peggy skirt only really requires your waistline measurement, so grab your tape measure and your natural waistline. If you do have va va voom hips that are bigger than your waistline measurement, even though the Peggy skirt is quite a loose fit over your hips but just to be safe also check your hip measurements just to be sure you will have the right fit.
Again the back of the envelope is your little gold mine of information to help you get started properly with any sewing pattern. Head to the back of the envelope packaging to find your correct size with your measurements you now have. Also determine the correct length of your Peggy Skirt, which sits just below the knee. If you prefer your Peggy skirt shorter or longer, you make the adjustments at the shortening and lengthening lines on the skirt pattern pieces.
Trace your pattern

When tracing your pattern you can use pattern weights, basically anything heavy, i use whatever cans of food are in the pantry, it works a treat! In regards to paper you can use to trace your pattern pieces, i use brown pattern tracing paper, which is transparent enough but also sturdy as well. You can use whatever paper you like, as long as it is transparent, baking paper from the kitchen works just as well as the expensive stuff.
So to start with trace off your chosen size ( The sizes you noted down from the back of the pattern packaging), if you found you were in between sizes you will need to overlap into different sizes. It is important to trace each pattern piece as accurately as you can, this is where if you have some curved rulers they will come in handy. Make sure to copy down all the important info and pattern markings, and notches. It is also a good idea to label each pattern piece, and the size you are using, and any instructions they have i.e cut on the fold, grain lines etc
Once you have done all that, cut em out!
Cutting out your fabric

Once you have cut out all your pattern pieces mark sure to transfer all the pattern info across onto your fabric. There are a million ways to do this, but for now i will share how i do this. I simply snip the notches on my fabric pattern pieces, seen below on the Peggy skirt pocket.


Now you can lay out your pattern pieces as shown in the cutting layout diagrams on the instruction sheet, page 1 or as economically as you can with the fabric you have.

Once you have cut out all your pattern pieces mark sure to transfer all the pattern info across onto your fabric. There are a million ways to do this, but for now i will share how i do this. I simply snip the notches on my fabric pattern pieces, seen below on the Peggy skirt pocket.

And use wax tracing paper and a tracing wheel to transfer across the front skirt tucks and the back skirt darts on the skirt pattern pieces. For me i find this the easiest and clearest way, it also means i can come back to the pattern pieces later on with them still clearly marked, pins i find seem to go astray.

That's it for today, tomorrow we will get stuck into assembling our skirts, that'll be the applying our interfacing, front tucks, back darts etc.
Until the next sew-along i encourage everyone to post and share your progress as the sew-along progresses. Also remember this is your sew-along so please let me know if i have missed anything, or if you want to know something in particular and ill try my bestest to help you out!
Don't forget to grab the sew-along button if you are joining in!
So tell me....I would love to know what fabric you have picked out your Peggy skirt ?
Which waistband variation are you stitching up?
Abby
xx
No comments
Post a Comment
Thank you so much for the visit and leaving a comment!
I totally appreciate them all!
Happy sewing!
Abby
x